Sunday, July 24, 2016

Mee Rebus

Mee Rebus is one of my favourite Malay foods. Every time when weekend comes, my mum will ask me what I am going to cook. So this weekend I decided to cook Mee Rebus for my family. This is my first time cooking this dish and family love it very much. 


Recipe Source:

材料:(约6人份)
  • 小葱  10粒
  • 蒜瓣  8粒
  • 香茅(白色部分)  1支
  • 南姜  8g
  • 虾米干  40g
  • 豆酱  120g(磨烂)
  • 咖哩粉(肉类)  65g
  • 辣椒粉  15-20g
  • 清水  1200ml
  • 橙色番薯泥  700g
  • 白砂糖  1.5-2Tbsp
  • 适量盐(如果不够咸才放)
  • 黄面  800g 
  • 豆芽 200g

配菜:
  • 水煮鸡蛋  6粒
  • 豆干(大)2片(油炸后切小块)
  • 炒香花生碎
  • 红葱油酥
  • 青辣椒
  • 芹菜
  • 酸柑
  1. 小葱,蒜瓣,香茅,南姜和虾米干放入搅拌机里打成糊状。
  2. 热油锅,把做法(1)炒香至油水分离,加入豆酱炒1-2分钟,加入咖里粉和辣椒粉炒均匀。
  3. 倒入清水和蕃薯泥,煮滚,再用中小火焖煮20-30分钟(期间要不断搅拌以免锅底烧焦)。
  4. 加入白砂糖调味,试味,不够咸加入适量的盐,如果酱汁太浓,可加适量入清水稀释。


组合:
  1. 黄面和豆芽用热水烫熟,沥干水分,装在盘里,淋上煮好的酱汁。
  2. 再加入鸡蛋,豆干,花生碎,红葱油酥,青辣椒,芹菜,挤上酸柑汁,即可开吃。

Tuesday, July 19, 2016

Cheese Cupcake

Did a simple cheese cupcake for this week theme. Luckily fridge got all the ingredients I need for this bake. Time to carry on with my paperwork and enjoy this bake. 


Monday, July 18, 2016

Kueh Salat

When I did the Steamed Lapis, my mum was asking "why don't make the Kueh Salat?" So to satisfy her crave, I decided to make it the next day for her.  It was my first time making this kueh and I am very satisfied with the end result though the top layer is not nicely spread. Overall the taste is satisfactory. 


Recipe Source:

Bottom Layer

350g Glutinous Rice, soakedfor 4 hours and drained
200ml thin Coconut Milk (100ml thick coconut + 100ml water)
1tsp salt
blue pea flowers (bunga telang), optional

Top Layer
2 eggs (large)
150g Caster Sugar
100ml Pandan Water (Blend about 12 pandan leaves (screwpines leaves) with 100ml water)
400ml thin coconut milk (200ml thick coconut milk + 200ml water)
120g All-purpose Flour
25g Tapioca Flour ( increase to 30g)
¼ tsp salt

Methods: 

1.Bottom Layer: Steam glutinous rice with coconut milk and salt for 30 minutes. Rest for about 10 minutes, then transfer and press steamed rice onto a bottom of a 8" square pan (I take small portion of rice to mix with blue pea flower water).
2.Top Layer: Whisk eggs with sugar until sugar is dissolved. Add in pandan water, coconut milk, salt and pandan paste. Mix well.
3.Sift in flours and whisk till well combined. Strain the mixture and rest for 10 minutes. 
4. Cook the flour mixture in a heavy saucepan on low heat, stirring all the time to ensure it doesn’t burn until it thickensl slightly (when the batter is able to coat the back of a spoon). Remove from heat. 
5. Pour the mixture on top of cooked glutinous rice (press to tighten), smooth the top and steam over medium heat for 30 minutes (do not steam over high heat).
5.Cool completely before slice with plastic knife.


Saturday, July 16, 2016

Steamed Layer Cake (Steamed Lapis)

I have wanted to make this Steamed Layer Cake but always put on hold. Since I am on medical leaves this week and the theme for today is Kuehs,  therefore I try making it. It was easier than I thought and I am very happy with the kueh. 


Kuih Lapis (Steamed Layer Cake

  Ingredients:
   350g Tapioca Flour
   100g Rice Flour
   500ml Water
   400g Sugar (used 280g)

    4 Pandan leaves
    500ml Thick coconut milk with a pinch of salt
     Blue Peas / Blue colouring

     Method:

  • In a pot boil water,sugar and pandan leaves together till sugar dissolved. Turn off heat, discard pandan leaves and add in coconut milk. Stir well and leave aside to cool.
  • Mix tapioca flour and rice flour together and gradually blend well into coconut liquid with a hand whisk. Then strain mixture through a sieve to ensure it is free from lumps.
  • Divide mixture in two equal portions and add desire colouring into one portion, keeping one portion white. (You can use more colours if you prefer to have more colourful layers)
  • Grease a 7 inch square or round cake pan and place in steaming pot for few minutes over high heat.
  • Pour about 100-125ml of white liquid into the heated pan and steam at high heat for about 4 minutes or until batter is cooked. Then add 100-125ml  of blue liquid onto it and steam for another 4 minutes. (reduce liquid for thinner layers)
  • Repeat the procedure, alternating white and blue liquid until all the batter is used up. Remember to stir the batter every time before pouring out the liquid to steam each time.
  • Add a little more blue colour to the last layer to make it a deeper shade of blue,and steam the whole cake for about 15 mins.
  • Leave Kuih Lapis to cool completely after steamed and invert the cake pan to knock out the kuih.
  • Grease knife with little oil before cutting. You may also brush a little oil on the surface as gloss finishing.

Tuesday, July 12, 2016

Spinache Chicken Pie

Trying a different taste. Instead of pork, I used chicken instead. This pie is very rich as I added home made cottage cheese, Mozarella Cheese and Cheddar cheese. 
As for have run out of puff pastry, therefore I used the Popiah Skin. Overall is still not bad although I still prefer with puff pastry. I'm 


Spinache Chicken Pie

Ingredients
- 4 (9 inch) unbaked pie crusts or po pian skin
-       100ml milk
-        3 slices bread   
- 300gram ricotta cheese 
- 6 eggs 
- 8 ounces mozzarella cheese, grated 
- 1 pound chopped bacon
-       100g mince chicken
- 1/2 pound salami, chopped 
- 1/4 pound prosciutto, chopped 
- 1/4 cup grated Parmesan cheese 
- 400gram of spinach

Directions
1. Preheat oven to 325 degrees F (165 degrees C).

2.     Mix milk with bread in a mixing bowl. 

3. Place ricotta in a large mixing bowl and add 2 eggs one at a time while mixing on low speed. Stir in mozzarella, bacon, salami, minced chicken, spinach and prosciutto until all ingredients are well combined. Line 9 inch pans with pastry. 

Spoon mixture into pan. Sprinkle Parmesan cheese over the pie. Dip 4 holes and crack an egg in each hole then cover with top pastry. Crimp edges and cut steam vents in tops. brush the pie with egg or milk.

4. Bake in preheated oven for 1 hour, until crust is golden brown. Cool on racks.

Sunday, July 10, 2016

Chinese Molten Salted Yolk Steamed Buns

I love Chinese Molten Salted Yolk Custard Steam Buns but have not try making them myself. This is a tough homework. The fillings is nice but it does not flows well. Needs to practice more.  


Salted Egg Custard Filling 

Makes 9 portions of filling
3 salted duck eggs, fully cooked, shelled and use egg yolks only
60g unsalted butter, soften
30g icing sugar
5g cornflour
30g dry milk powder
25ml coconut milk 

Bao Dough:
280g Hong Kong Pao Flour
1/2 tsp baking powder
1/2 tsp salt
1 1/2 tsp active dry yeast
15g sugar
1 tbsp canola oil
125-140ml water

Custard Filling:
Make the filling one day ahead.

Using a fork, mash the salted duck egg yolks into fine crumbs. Using a wooden spoon or an electric mixer, beat butter and icing sugar in medium speed until combined. Lower mixing speed to low and add the remaining ingredients and mix until well-combined.

Refrigerate the custard filling until cold and firm. When firm, use a cookie scoop to scoop out and divide the custard into 12 portions.  Place the custard balls on a plate or container (lined with cling wrap for easier removal, optional), freeze it overnight with a cover or cling wrap.

To make bao dough

Combine all bao ingredients and knead to form a smooth dough (at least 20 mins) and then let it rise for 1 hr.

When the dough is ready, divide into 10 portions. Meanwhile, set water to boil in a steamer. 

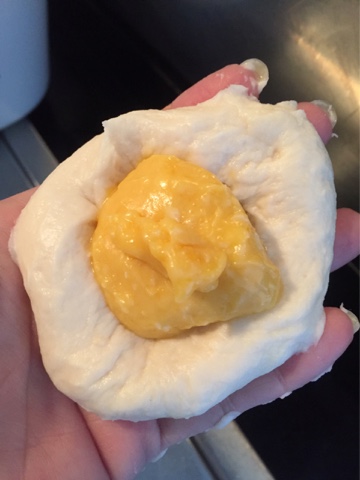
Flatten the dough pieces with your hands, and place a frozen custard filling ball in the center. Pinch up the sides of the dough to completely enclose the filling.

Place each bao on each paper cup liner or a small piece of baking paper with its seam sides down. Rest the bao in warm mist for 10-15 mins. Place bao on the heat proof containers or steaming baskets that you are using to steam. Cover the bao with cling wrap and allow the bao to rest for 10-15 mins.

Steam baos with moderate heat for about 8-15 mins until done. 

Beware! Please DO NOT use too high heat or over-steam!!! Otherwise, the custard filling will explode out of the bao.


Thursday, July 7, 2016

Bundt Cake

Today was a very busy day. Was on leave for a few days and office works are piling up. This bake was not very nicely done but my Mission is finally accomplished. Phew.. finally can submit my homework on time. I used the balanced lemon curd and home made cottage cheese for decorations. Overall still look not bad.